In this post, you'll learn ...
- How to up-cycle your old doors into a new and useful headboard.
- Each step from removal, sanding, painting and mounting your headboard.
- Other up-cycled options for your old doors.
- Need to get new doors before starting this project? Browse our entry doors.
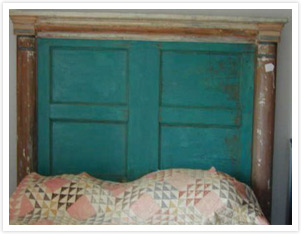
How to Make a Stunning Headboard with Your Old Doors
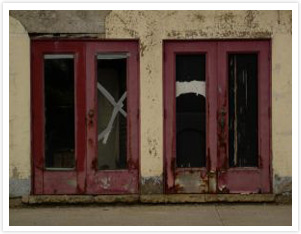 Are your entryway doors past their prime? Are they hard to open and close? Are you watching your hard earned money slip away through drafty doors? If you are replacing your old wooden entry doors with new ones soon, there are a number of things that you can do with your old ones. If they’ve given you trouble, and you’re glad to see them go, a bonfire might not be amiss. However, if you prefer to reuse and recycle, you can up-cycle your old doors and make them into a stunning headboard by following the instructions in this how-to.
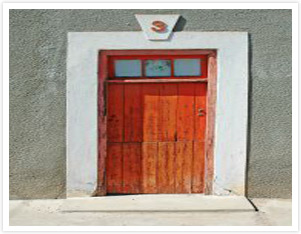
Your New Doors
Before you start your new project, you should order new doors. You can’t leave the house open to the elements, so this should be the first thing on your to-do list. Your new doors should be attractive and energy efficient so you know you’re improving home value. Some of the most durable, energy efficient materials for entry doors are steel and fiberglass. If you like the look of wood, you have that option as well, but must consider that wood will expand and will potentially warp – especially if you utilize a wooden doorframe.
Luckily, Stanek Windows has a variety of entryway doors available such as Waudena doors (even doors that look like wood). Leave it up to Stanek to determine the most energy efficient, beautiful door within your budget with a free in-home estimate. The next step after that is starting your new headboard project!
Removing the Old Door
Most new doors will come pre-hung. This means they already have door jambs with weather stripping. As a result, your old door jamb, door and all, will be removed prior to installing the new one. If you are doing this yourself, carefully remove the trim around the door. If you do not plan on reusing this trim, you can be a little rough with it, but you still want to be careful not to damage your walls.
Once that’s done, you can remove the door, which is very easy to do. Be sure to have a helper to hold the door while you remove the screws from the hinges. Once the screws have been removed, the hinges should pop out of the jamb. Once the door is out of the way, you will need to remove the jamb, which will expose the door frame.
When the door frame is exposed, this is when you’ll need to put in the new door, or seal the area so the elements don’t wreak havoc inside. If you’ve purchased your new pre-hung door, it’s the best idea to have a professional install the door to ensure no “mishaps” occur during a DIY install. If you are having the pros install the door, be sure to let them know you want to keep your old door or doors.
Remove Old Hardware
Now that your door has been removed, you can start your project. The first step is to remove any hardware attached to the door including the knob and the deadbolt. Next, remove the hinges if they are still attached to the door. After you have removed the hardware, it’s typically a good idea to clean the door. Simply wash it down with soap and water and wipe it dry. The door will need to dry for several hours or overnight prior to continuing your project.
Measure and Cut the Door
 Before you go any farther, you need to measure your space and decide if the door needs to be trimmed down.
Measure the width of the bed and decide how many inches you want the headboard to hang over (if at all) on each side. In most cases, the door will already be the length you need for a queen bed, but depending on your door height, you may need to trim it.
*If your door is symmetrical, you need to trim off some wood on both ends to maintain that symmetry.
Fill in Holes
Once everything has been removed from the door, the next step is to fill in any holes with wood putty.
You can fill the hole where the doorknob and the lock used to be. The easiest way to do this is to find a piece of scrap wood that fits into the hole and fill around it with wood putty. Let it dry and sand it down. You also have the option of hanging the headboard with that side down. The holes where the knob and lock used to be should be obscured by the mattress and/or bedding.
Add Your Details
Want to “fancy-up” your doors? You have the option of adding trim to the top of your headboard to either match the details of your room, or to hide any nicks and dings from the door’s old days.
Chair rail or crown molding works well for this option – don’t worry about the color not matching if you choose to use leftover molding, we’ll take care of that in the next step.
Cut a piece of trim that is the same length as the door and cut 45 degree angles on each end. Attach it to the top of your door with wood glue, nails or a combination of both. Cut two smaller pieces of trim, with matching 45 degree angles, to finish the sides. You generally don’t have to worry about the bottom, because it will be hidden by the box spring.
Sanding and Painting Your Door
 If you have an antique door, you may simply choose to leave it as is. However, most headboards look best with a coat of paint, especially if you have added details like crown molding. So, once your wood putty (from where you filled in the holes) is dry, you will sand the door.
You can do this by hand or you can use an electric sander, just remember to go from 60 grit (very coarse to get old paint or finish off), to 120 grit (fine grit to get imperfections out of the wood) and finish with 180 grit (very fine grit to smooth out the wood). Once you have finished sanding, wipe the door down with a tacky rag to clean off all of the dust and debris.
Now you can prime and paint your door. Choose a color that complements the room and your bedding, generally this will be a natural color. White is one of the most versatile, crisp colors to choose. While picking up the paint of your choosing, remember to get a roller for quick coverage and a small brush for nooks and crannies.
When choosing paint, chose one with a built in primer, to save yourself a few steps and some time. Once your first coat is on, wait 24 hours to ensure it is dry. Also, watch for drips from heavy application.
Hanging Your Headboard
Once your door is completely dry, you will prepare to hang it. And when it comes to hanging the headboard, you have several options to ensure it is secure. Exterior doors can be quite heavy, especially depending on the material.
One option is called a French cleat. This type of hanger consists of two pieces that fit into one another, and it can bear a great deal of weight. The easiest thing to do is visit your local hardware store and purchase one of these hangers. Be sure to check the weight rating so that you buy a hanger that is strong enough to hold your headboard safely. Attach one piece to the wall and one piece to the headboard. Be sure to follow the instructions on the packaging.
You can also make your own French cleat hanger. Take a piece of 1x4 and cut it to the length of your headboard, minus 2 inches on both sides. Then, mark a 45 degree angle on one end and cut the 1x4 lengthwise. This will leave you with two triangular strips.
Attach one of the strips to the wall with the point of the triangle facing up (attach this to the studs). Attach the other strip to the headboard with the point of the triangle facing down. Lift the headboard into place. The goal is to have the two pieces fit together like a puzzle piece. This method will push your headboard out from the wall and add depth to your headboard. With this method, you’ll need to place a solid 1x4 strip along the bottom of it to counteract the depth of the top.
For lighter doors, you can also use a picture hanger and wire. You will need to be sure that all of your hardware is capable of bearing the weight, so check the weight of the door and make sure it’s compatible with the hardware.
Your last option is a bit faster, but you will need to keep in mind that you’ll have to patch up holes: drill through the headboard and attach it to the studs in the wall.
Other Options
This is not the only way to up-cycle your old door. If you have two doors, for example, you can stand them on their ends, side by side, to create a unique headboard. If you are up to the woodworking challenge, you can add legs to your door and make a larger headboard. If you have a second door, you can trim it down and create a matching footboard.
Headboards aren’t your only option either, and there are a variety of things that you can do with old doors. You can create tables, swings, and much more.
So, if it’s time to replace your entry doors, don’t throw out your old ones—reuse them instead! What do you think you could make out of an old door?
 You May Also Be Interested In: